Delta Kitchen Faucet Repair Diagram – Everything in Details
Delta kitchen faucets are well-known for being reliable and highly durable. But they are not perfect.
After all, they have moving parts, which can fail at one point or another. And before you troubleshoot any issues, you must have a fair idea about the Delta kitchen faucet repair diagram.
Wondering what the diagram show?
The Delta kitchen faucet repair diagram shows all the parts you need to work with during a repair. It gives you a clear picture of the components and their names. And when you know which part is what, following a guide becomes a piece of cake.
Now that you have a little idea about the Delta kitchen faucet’s repair diagram, you would want to know what to get the full picture, right?
Well, you will soon be able to see it in all its glory below!
In-Depth Look at the Repair Diagram of Delta Single-Handed Kitchen Faucet
When you are trying to fix the Delta kitchen faucet leaking at base issue or want to follow another Delta faucet troubleshoot process, the repair diagram always comes in handy.
So, let’s dive straight in and let you know all about the Delta faucet replacement parts that the repair diagram shows −
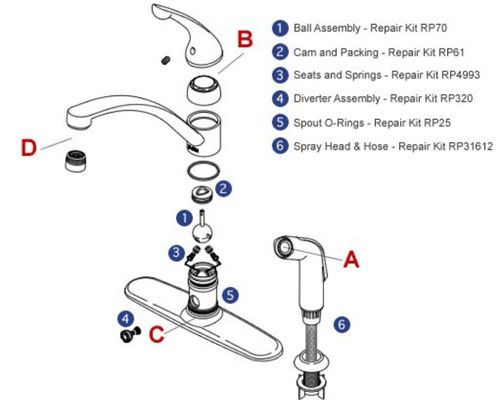
1. Ball Assembly
The ball assembly of the Delta faucet controls the flow of hot and cold water.
And when it becomes faulty, you might notice the faucet offers hot water in the cold setting or cold water in the hot setting. There can also be leaks.
2. Cam and Packing
The cam and packing are part of the valve assembly. They play a part in controlling the flow of water.
Wondering what will happen if they are faulty?
As you might have guessed, there can be leaks, difficulty turning the handle, and trouble controlling the water flow.
3. Seats and Springs
The springs and seats of the Delta faucets are integral parts. As you can tell, they are two different parts. But the diagram shows them as one for simplicity.
Nonetheless, they help to shut the flow of water. The seats hold the springs, which push the ball to block the flow.
And when either of these becomes faulty, the faucet will not close completely. There will be dripping.
4. Diverter Assembly
As the name suggests, the diverter assembly diverts the water back and forth between the showerhead and the faucet.
That means when there is an issue with this part, you might not get water from either.
5. Spout O-rings
The O-rings or gaskets of the Delta kitchen faucets ensure that the seal is correct.
However, they can become worn with use. And when they wear down, there will be leakage at the base of the faucet or the handle.
6. Spray Head and Hose
Even though the diagram labels the spray head and hose as a single part, they are actually two different parts.
You might need to replace the sprayer head when it is malfunctioning. For example, it might start to offer a decreased flow of water.
On the other hand, the hose may have leakages for regular wear and tear. That will call for a replacement.
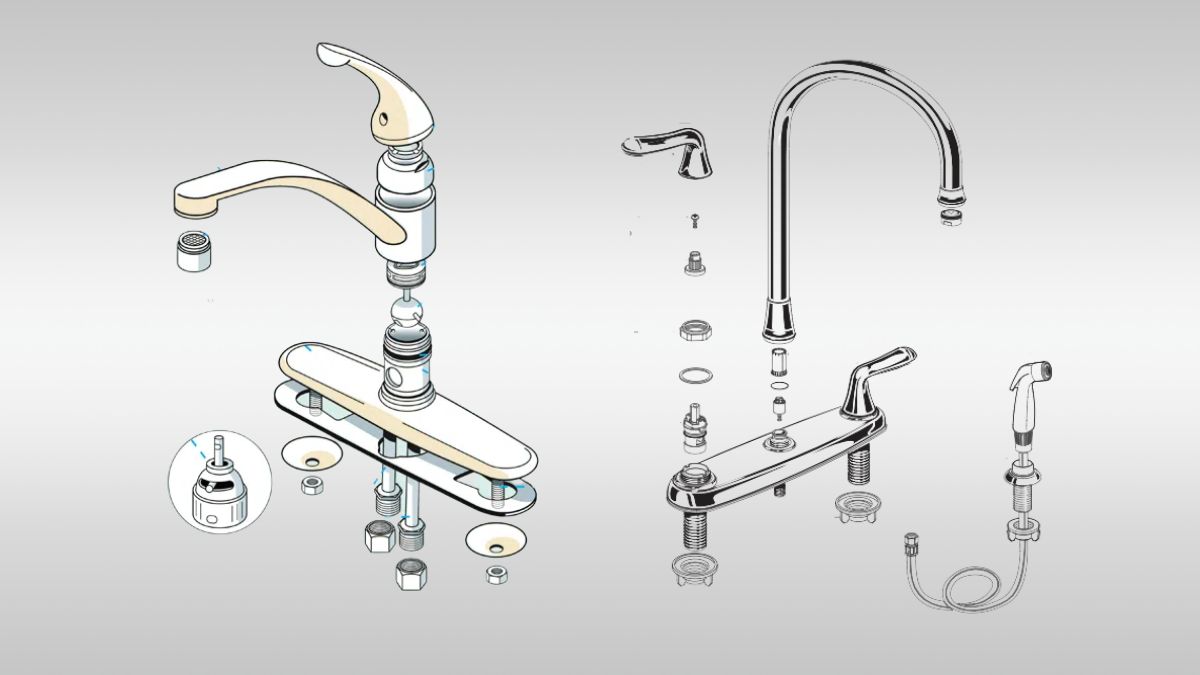
Delta Double-Handled Kitchen Faucet Repair Diagram
Own a double-handled Delta kitchen faucet? In that case, there is a little change in the repair diagram. Take a look −
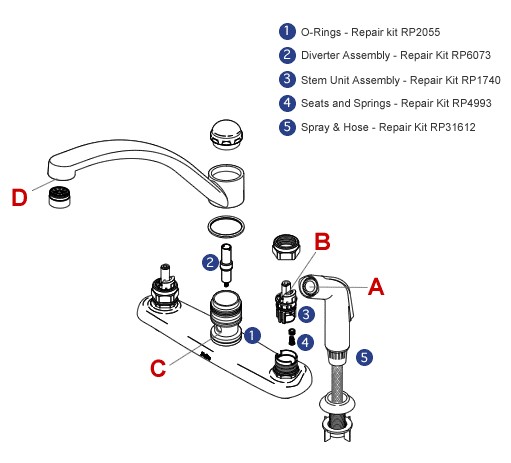
1. O-Rings
The main task of the O-rings is to create a seal inside. And by doing so, they prevent leaks. Yes, their function is totally the same as the single-handled faucet.
2. Diverter Assembly
Again, the role of the diverter assembly in the double-handled faucet is the same as the single-handled faucet. It diverts the flow of water from the faucet to the sprayer head.
3. Stem Unit Assembly
The stem unit assembly of the double-handled faucet enables the rotation of the handles. And when it has issues, you will find it hard to rotate the hot or the cold handle.
4. Seats and Springs
The seats and the springs of the Delta double-handled faucet controls the flow of water. They are why you can stop the water flow on the tap.
And you would need to replace them if the faucet fails to shut the flow completely.
5. Spray and Hose
Delta double-handled faucets also come with a spray and hose. And as you know, they are two individual parts.
You might need to replace either of the two if you are not getting a proper flow of water from the sprayer head.
Frequently Asked Questions
1. How can I tell what model Delta faucet I have?
The easiest way to tell which Delta faucet model you have would be to check the packaging. You will find the exact model number near the UPC code. If it is not there, check the top of the box.
2. Can you replace the parts of the Delta faucet?
You can replace all the parts of your Delta faucet. And the great news is that Delta offers all the repair parts by itself. So, you will not need to look for replacement components in third-party stores.
3. Does Delta give free replacement parts?
As long as the faucet complies with the warranty policy, Delta will replace the faulty parts free of charge. And in most cases, you just need to check the warranty period before attempting to get free repair components for your Delta kitchen faucet.
Final Words
So, that’s all about the Delta faucet repair diagram. And hopefully, going through the charts helped you know about the part that you need to replace.
On that note, when it comes to getting replacement parts, you should always get Delta-authorized components. Delta faucets are not compatible with other parts.

![Delta Single Handle Kitchen Faucet Leaking at Base! [Solved]](https://faucetfam.com/wp-content/uploads/2023/03/Delta-Single-Handle-Kitchen-Faucet-Leaking-at-Base--768x432.jpg)