What Size Allen Wrench for Delta Shower Handle
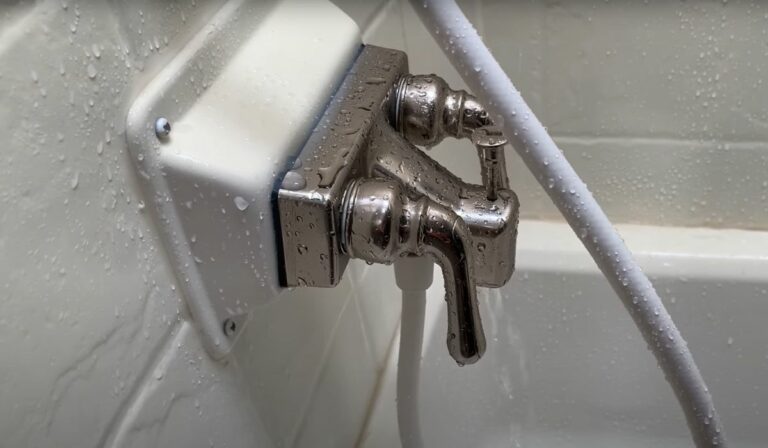
You’ll most likely need a 3/32 inch or 1/8 inch Allen wrench to remove or install your Delta shower handle. These sizes fit the set screws that hold the handle to the valve stem. Make sure you use the correct size to avoid stripping the screw. If you’re unsure, check under the handle for the screw or try each wrench gently. Keep going, and you’ll find tips to make the process smooth and protect your handle from damage.
Common Allen Wrench Sizes for Delta Shower Handles
When working on a Delta shower handle, you’ll most often need an Allen wrench measuring 3/32 inch or 1/8 inch. These sizes fit the set screws that secure the handle to the valve stem.
Using the correct size is crucial because a wrench too small can strip the screw, while one too large won’t fit properly. In addition to 3/32 inch and 1/8 inch, some models may occasionally require slightly different sizes, but these two are by far the most common.
Make sure your wrench has a snug fit to avoid damaging the hardware. Having a set of Allen wrenches on hand will help you quickly find the right size without guesswork, making handle removal and installation smoother.
Identifying the Correct Allen Wrench for Your Model
Knowing that 3/32 inch and 1/8 inch Allen wrenches fit most Delta shower handles gives you a solid starting point.
To identify the correct size for your specific model, first remove any decorative caps or covers on the handle to expose the set screw. Check the size of the screw head visually or use a caliper to measure it precisely.
If you have your model number handy, consult Delta’s official website or user manual, which often lists the correct Allen wrench size.
When in doubt, test the fit by trying each wrench gently—choose the one that fits snugly without forcing it. Using the right size prevents stripping the screw and ensures smooth handle removal or installation.
Tools Needed for Removing and Installing Delta Shower Handles
Before you start removing or installing a Delta shower handle, gather the essential tools to make the process smooth and efficient. You’ll need a correctly sized Allen wrench, typically between 3/32 and 1/8 inch, to loosen or tighten the set screw.
A flathead or Phillips screwdriver might be necessary if your model includes decorative caps or screws. Keep a towel or cloth handy to protect the finish from scratches during removal.
Additionally, having a pair of needle-nose pliers can help if any parts are stuck or hard to grip. Finally, a flashlight can improve visibility inside the handle assembly.
Having these tools ready ensures you won’t have to stop mid-task searching for the right equipment.
Step-by-Step Guide to Using an Allen Wrench on Delta Handles
Although using an Allen wrench on Delta shower handles might seem tricky at first, following a clear step-by-step approach makes the task straightforward.
First, locate the small set screw on the handle’s underside or side. Identify the correct Allen wrench size—usually 3/32″ or 1/8″—to fit snugly into the screw.
Insert the wrench fully into the screw to avoid stripping it. Turn the wrench counterclockwise to loosen the screw; don’t force it if it resists.
Once loosened, gently pull the handle off the valve stem.
To reinstall, align the handle onto the stem, insert the set screw, then tighten it clockwise with the Allen wrench until secure.
This method ensures safe removal and installation without damaging your Delta shower handle.
Tips to Avoid Damaging Screws and Handles During Maintenance
When working with Delta shower handles, you’ll want to handle screws and components carefully to prevent damage. First, always use the correct size Allen wrench—using one too small or too big can strip the screw head.
Before loosening screws, apply a little penetrating oil if they seem stuck to reduce resistance. Turn the wrench gently and steadily; avoid forcing it. Keep the wrench perpendicular to the screw to ensure a secure grip.
When removing handles, support them with your hand to avoid dropping or denting. Clean screws and handles regularly to prevent buildup that may cause stiffness.
Finally, store your tools properly to keep them in good condition for future maintenance. These steps will help maintain your Delta shower handle’s longevity.
Frequently Asked Questions
Can I Use a Torx Wrench Instead of an Allen Wrench?
You can’t use a Torx wrench instead of an Allen wrench because their shapes differ. Allen wrenches have hexagonal tips, while Torx wrenches have star-shaped tips, so they won’t fit or turn the same screws properly.
How Do I Clean the Shower Handle Without Removing It?
You can clean your shower handle by wiping it with a damp cloth dipped in mild soap and water. Avoid harsh chemicals, and use a soft toothbrush for crevices. Rinse and dry thoroughly to prevent water spots.
Are Delta Shower Handles Compatible With All Valve Types?
Delta shower handles aren’t compatible with all valve types. You’ll need to check your specific valve model since Delta designs handles for their own valves. Always confirm compatibility before purchasing or installing new handles.
What Should I Do if the Allen Screw Is Stripped?
If the Allen screw is stripped, try using a rubber band for extra grip or a screw extractor tool. You can also carefully drill a small hole to remove it, but be cautious not to damage surrounding parts.
Can I Replace a Delta Shower Handle Without Turning off Water?
You shouldn’t replace a Delta shower handle without turning off the water. Doing so risks leaks or water damage. Always shut off the water supply first to avoid any messy surprises during your repair.
Conclusion
Now that you know the common Allen wrench sizes for Delta shower handles, you’ll find it easier to tackle repairs or replacements. Remember to identify your specific model and use the right size tool to avoid stripping screws or damaging the handle. With the proper tools and careful steps, maintaining your Delta shower handle becomes a simple task. Stay patient, follow the tips, and you’ll have your shower working smoothly in no time.