How to Replace Shower Fixtures Video
To replace shower fixtures, start by turning off the water supply and clearing the area. Remove the old handles and escutcheon plate carefully using a screwdriver. Clean the valve area before installing new valves and handles securely. Wrap plumber’s tape around the shower arm threads before attaching the new showerhead to prevent leaks. Tighten everything by hand, then test for proper flow and leaks. Keep following for tips on maintaining your new fixtures and ensuring a smooth install.
Tools and Materials Needed for Replacing Shower Fixtures
Before you begin replacing shower fixtures, gather all the necessary tools and materials to ensure a smooth process. You’ll need an adjustable wrench, a screwdriver set, plumber’s tape, and a utility knife. Have a bucket or towel handy to catch any water drips.
Don’t forget replacement fixtures that fit your shower’s specifications, such as a new showerhead, valve handle, or trim kit. Additionally, keep a pair of pliers and a pipe wrench nearby for stubborn nuts or pipes.
If your fixtures are sealed with caulk, a caulk remover tool will help. Make sure to have safety gloves and goggles to protect yourself during the job.
Having everything ready upfront prevents interruptions and makes the replacement quick and efficient.
Preparing Your Bathroom and Shutting Off Water Supply
With all your tools and materials ready, the next step is to prepare your bathroom and shut off the water supply. Start by clearing the area around your shower to give yourself plenty of room to work safely and comfortably. Lay down a drop cloth or old towels to protect your floor from water spills and debris.
Next, locate the main water shutoff valve for your home or the individual valve for your shower. Turn the valve clockwise to close it, stopping the water flow. Open the shower faucet to drain any remaining water in the pipes—this reduces mess and pressure while you work.
Double-check that the water is completely off before moving forward to avoid surprises during fixture removal.
Removing Old Shower Fixtures Safely
Although it might seem straightforward, removing old shower fixtures requires careful attention to avoid damaging your plumbing or walls. Start by loosening the fixture handles with the correct screwdriver or Allen wrench, then carefully remove them.
Next, unscrew the escutcheon plate, which covers the valve and protects the wall. Use a gentle prying tool if it’s stuck, but avoid forcing it to prevent wall damage.
When you reach the valve, check for corrosion or mineral buildup and clean it gently. Be cautious with plumbing connections—don’t use excessive force on pipes or fittings.
Once everything’s removed, inspect the area for leaks or damage before proceeding. Taking these steps ensures a smooth, safe removal process without costly repairs later.
Installing New Shower Valves and Handles
After removing your old shower fixtures carefully and inspecting the valve area, you’re ready to install new shower valves and handles. First, ensure the water supply is off to prevent leaks.
Position the new valve body in place, aligning it with the plumbing. Secure it firmly using the provided screws or mounting brackets.
Next, attach the trim plate, making sure it sits flush against the wall to prevent water seepage behind it.
Finally, install the handle by sliding it onto the valve stem and tightening the set screw.
Test the valve operation by turning the water on briefly to check for leaks and smooth handle movement. Adjust or tighten components as needed before finishing the installation.
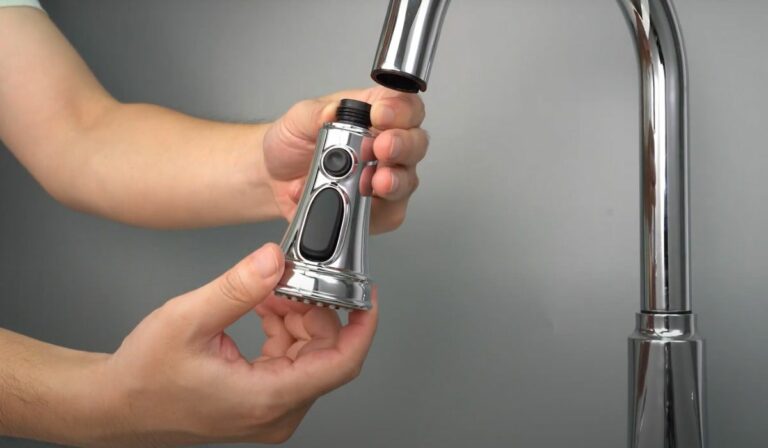
Attaching the New Showerhead Correctly
Before you attach the new showerhead, make sure the shower arm threads are clean and free of old plumber’s tape or debris.
Wrap fresh plumber’s tape clockwise around the threads two to three times to ensure a watertight seal.
Screw the new showerhead onto the shower arm by hand, turning it clockwise until it’s snug.
Avoid over-tightening, which can damage the threads or the fixture.
If needed, use an adjustable wrench with a cloth to gently tighten it further, protecting the finish from scratches.
Align the showerhead so it faces the desired direction, then check that it feels secure.
Proper attachment prevents leaks and ensures your new showerhead functions smoothly without wobbling or dripping.
Testing for Leaks and Proper Water Flow
Once you’ve secured the new showerhead, turn on the water to check for leaks and ensure proper flow. Watch closely where the showerhead connects to the pipe; any dripping means you need to tighten the connection or add more plumber’s tape.
Let the water run for a minute to see if it flows steadily and with enough pressure. If the flow seems weak or irregular, double-check that the showerhead holes aren’t clogged and that the valve is fully open.
Also, listen for any unusual sounds that could indicate internal issues. Fix any leaks promptly to avoid water damage and wasted water.
When everything looks good and flows smoothly, you know your installation is successful and ready for use.
Tips for Maintaining Your New Shower Fixtures
To keep your new shower fixtures working smoothly and looking great, regular maintenance is key. Start by wiping down your fixtures after each use to prevent water spots and mineral buildup. Use a soft cloth and mild cleaner—avoid abrasive pads that can scratch surfaces.
Check for leaks monthly; even small drips can cause damage or increase water bills. If you notice reduced water flow, clean the showerhead by soaking it in vinegar to dissolve mineral deposits.
Lubricate moving parts, like handles, with plumber’s grease to ensure smooth operation. Finally, inspect seals and replace worn-out washers promptly to avoid leaks.
Following these simple steps will extend the life of your fixtures, saving you time and money on repairs or replacements down the line.
Frequently Asked Questions
Can I Replace Shower Fixtures Without Professional Plumbing Experience?
Yes, you can replace shower fixtures without professional plumbing experience if you carefully follow instructions, turn off the water supply, and use basic tools. Just take your time and double-check connections to avoid leaks or damage.
How Do I Choose the Right Shower Fixture Style for My Bathroom?
You should match your shower fixture style to your bathroom’s overall design, consider your preferred finish, and check for compatibility with existing plumbing. Don’t forget to think about functionality and ease of cleaning before deciding.
What Are the Common Signs That My Shower Fixtures Need Replacement?
You’ll notice leaks, low water pressure, corrosion, or rust on your fixtures. If handles are hard to turn or water temperature fluctuates, it’s time to replace your shower fixtures to avoid bigger plumbing problems.
Are There Eco-Friendly Shower Fixtures to Reduce Water Usage?
Yes, you can find eco-friendly shower fixtures designed to reduce water usage. Look for low-flow showerheads or those with WaterSense labels—they’ll help you save water without sacrificing pressure or comfort during your showers.
How Long Does a Typical Shower Fixture Replacement Take?
You’ll usually spend about 30 minutes to an hour replacing a typical shower fixture. If you’re prepared and have the right tools, it’s a straightforward job that won’t take much longer.
Conclusion
Now that you’ve replaced your shower fixtures, enjoy the fresh look and improved functionality. Remember to test for leaks and ensure everything flows smoothly before finishing up. Keep your new fixtures clean and check them regularly to extend their life. With the right tools and a bit of care, you’ve successfully upgraded your shower. Don’t hesitate to tackle small maintenance tasks to keep your bathroom running perfectly. You’ve got this!