Bathroom Faucet Leaking at Base: Causes and Fixes!
Drops of water coming from the bottom of the bathroom faucet can make your water bill higher when you use it.
If your bathroom faucet leaks at the base, it mostly occurs due to the dirty or broken aerator, bad cartridge, and damaged O-ring in the packing nut. To fix the issue, clean the aerator or change the worn-out parts.
No need to panic as I’ll share all the reasons, ways to identify the issue, solutions, and tricks to maintain the bathroom faucet in this guide. Stay Tuned!
Common Causes for Bathroom Faucet Leaking at Base
Leaking of bathroom faucets is a pretty common issue that usually occurs due to a few reasons. These include:
1. Dirty or Cracked Aerator
In some cases, the water leaking at the base of the faucet happens as the aerator is covered in debris or it’s broken. When you turn on the handle, the fluid needs to travel to through the spout area. And, that way you get the water to use the water for bathroom purposes.
But, if the spout is blocked in the dirt like calcium buildups or damaged, the water can’t come out and eventually ends up leaking at the bottom.
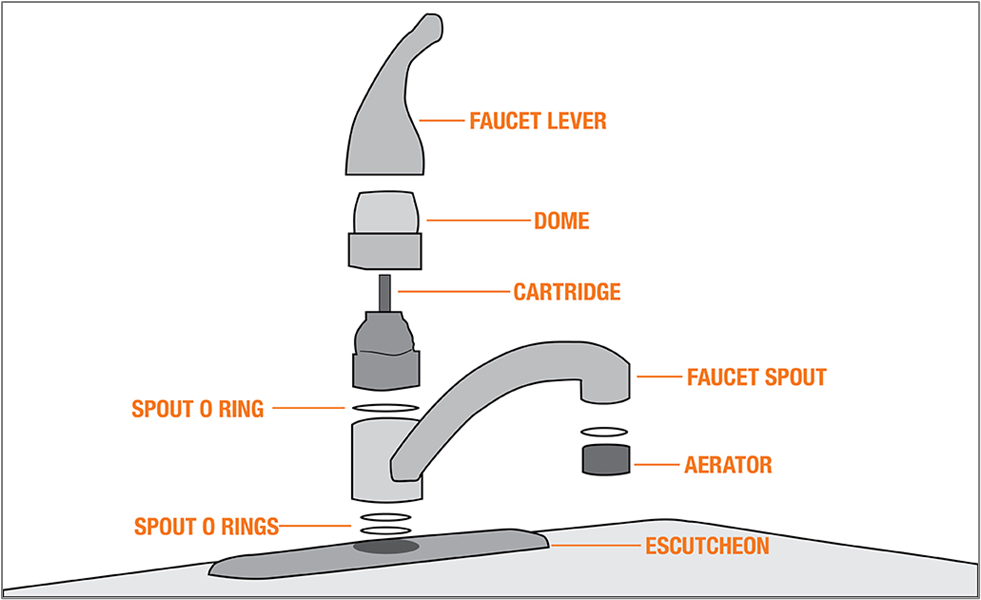
2. Damaged Cartridge
To control the flow of water in the bathroom faucet, the cartridge plays a great role. Inside the cartridge, there are some parts like O-rings, seats, and springs. These components help to ensure a watertight surface in both hot and cold line supplies.
But, when these parts tear apart, the cartridge becomes useless to control the fluid flow. Due to this, the water tends to leak from the escalator or base of the faucet terribly.
3. Bad O-ring in Packing Nut
The O-ring located in the base of the packing nut plays a crucial role in maintaining a proper seal. This rubber part can wear and tear over time due to its consistent exposure to water and temperature changes.
As a result, it can slowly become loose or worn out. When this occurs, it opens up a path for water to come out of the base when you open the handle. And so, the bathroom faucet leaks from the center hole and leaks some water.
How to Identify the Root Cause?
If you are confused to detect why your bathroom faucet leaks at the base when turned on, here’s a quick trick that’ll help:
- For the one or two-handle bathroom faucet leaking at the base, take out the aerator and clean it. Then, reinstall it and check for a dip. If it leaks again, then change the cartridge.
- For the two-handle mini or tall widespread faucet leaking at the base, remove the aerator and clean it. Next, reinsert it and look for leakage. If it dips water, then change the O-ring.
Steps to Repair Bathroom Faucet Base Leak
Once you figure out why the bathroom faucet is leaking at the bottom, it’s time to fix the problem. Here’s what you need to do, step by step:
Step 1: Identifying the Leak Source
You’ll need to turn on the water supply if you have one handle faucet. Then, put your hand at the base of the bathroom faucet to know if it’s leaking from the hot and cold sides of the faucet.
If you have a dual-handle faucet, just turn on the water and then place your hand at the base to find the problematic lever.
Step 2: Gather the Tools
Next, bring up all the things you’ll need to stop the water from dripping in the bathroom faucet base. Here’s a full list of the gear you’ll need –
| Tools | Materials |
| Adjustable wrench | New aerator |
| PPFT tape and Allen wrench | New O-rings |
| Philip and flat screwdrivers | New cartridge |
| A pair of needle-nose pliers | White or apple cider vinegar |
| Toothbrush | Bowl or glass |
| Aerator key, water pump pliers, or coin | Plumber’s grease |
Step 3: Turn Off the Water Supply
Next, shut off the water supply line on both hot and cold lines to avoid getting interrupted with water when doing the repairs. And then, drain all the water by turning on the faucet.
Step 4: Clean or Change the Aerator
Now, you’ll need to use the right tool to take out the aerator based on its type. In case you don’t know, here’s the detail:
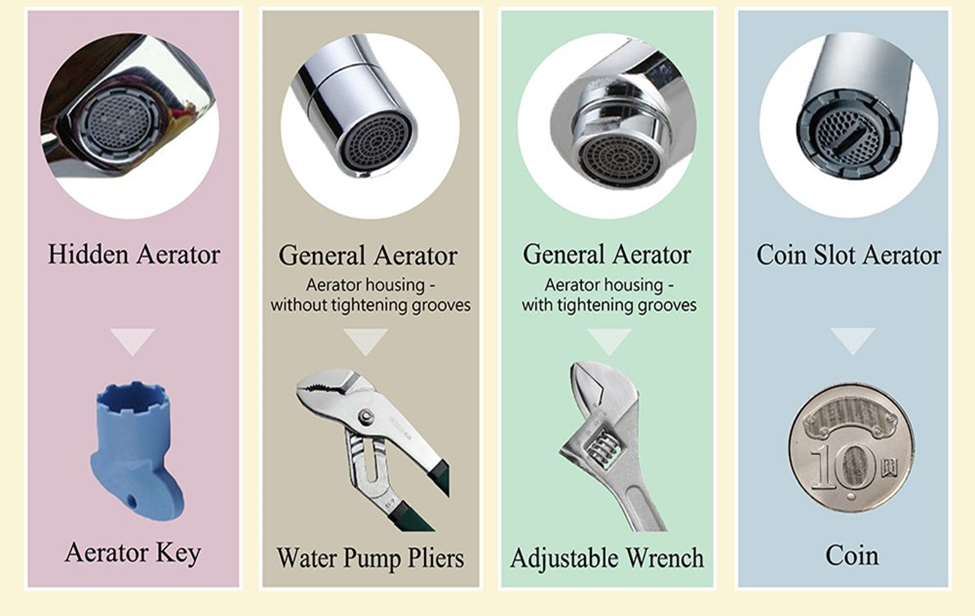
- Use an aerator key to remove the hidden aerator.
- If you have the standard aerator with no tightening grooves, use water pump pliers to take it out.
- For the standard aerator with tightening grooves removal, use an adjustable wrench to detach it.
- Try out a coin to unscrew the coin slot aerator.
Next, twist the aerator with the proper tool to take it out. Once you’ve removed it, check its condition. If it seems okay, disconnect the inner parts which include a tiny washer, tap filter, and male thread cover.
Then, take a bowl or glass and place all the inner parts of the aerator. Next, fill white or apple cider vinegar and ensure all the parts are covered.
After 2 – 3 hours, remove the parts and wash them using a toothbrush. Then, reinsert it by doing the reversal procedure.
If it seems bad in condition, just change it with a new aerator based on your bathroom faucet’s model to find the replacement part.
Step 5: Replace the Cartridge
Take out the screw cover from the lever or handle of the faucet and unscrew the set screw with the Allen wrench or screwdriver.
Next, use the Philips screwdriver to unfasten the inner screw (if contained) and then pull out the disk plate along with the flange. After that, use the water pump pliers to take out the plastic ring and then the metal ring with your hand.
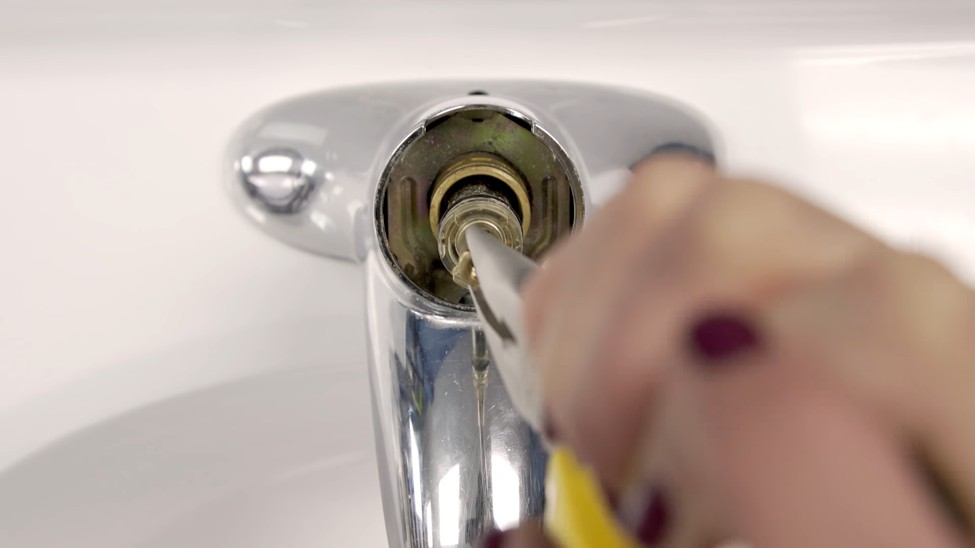
Now, use the white plastic tool that comes with a new cartridge to detach the old cartridge easily. Just place the water pump pliers on the plastic tool and twist it. Next, use the needle nose to detach the old cartridge.
Check its condition if its inner parts are worn out or not. If yes, then insert the new cartridge after applying the plumber’s grease. Or else, go to the next step.
| Note: If you have a dual-handle bathroom faucet, each handle contains a cartridge separately. So, do the same steps (mentioned above) on the problematic one (left or right side). |
Step 6: Take Out the O-ring in the Packing Nut
Now, use the flat screwdriver to pull out the big O-ring that is attached to the packing nut’s base. In some cases, you might need to unscrew the stem from the packing nut and then take out the O-ring.
Then, check its condition to understand whether to add a new one or not. If it’s bad in condition, simply insert a new one using the plumber’s grease and reinstall all the parts.
| Note: If you have a vintage faucet at home, then read here to know how to fix a leaky old-fashioned faucet. |
Maintenance and Cleaning Tips
- Do regular inspections to take care of the issue easily.
- Make sure to clean the faucet with mild detergents like liquid dishwashing soap and warm water. And, avoid using abrasives and chemicals that may scratch the faucet.
- Never use excessive pressure on the handles when using the faucet.
- Once in a while, ensure to lubricate the faucet if it gets rusted.
Overall Thoughts
Any bathroom faucet leaking at the base is sure a pain for busy folks. However, the repair process is easy to try at home with no skill as you only need to remove and install parts.
Just ensure to match the brand and model of your previous faucet to easily find the replacement parts.
Plus, do the mentioned procedure after checking the owner’s guide. And, I hope you find this content comprehensive to resolve the issue. Good Luck with Your Project!
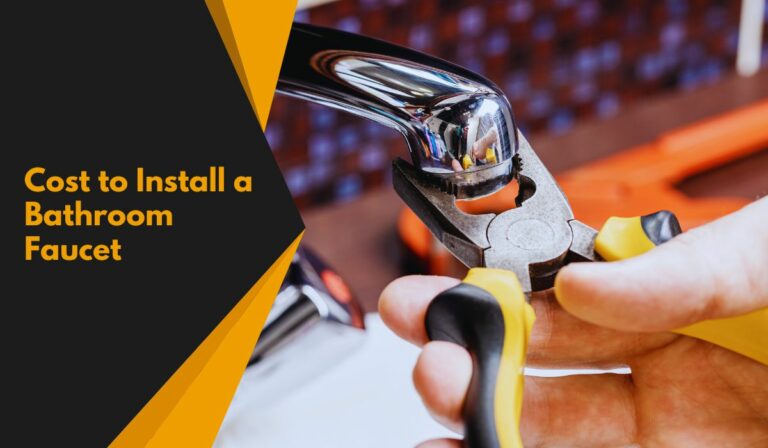
Now, if you plan to change the faucet instead of repairing tricks, learn how much it costs to install a bathroom faucet here.