How to Install Shower Faucet Single Handle
To install a single-handle shower faucet, first turn off the water supply and remove the old faucet handle and trim plate. Clean the plumbing area, then apply plumber’s tape to the new valve threads and securely install it. Attach the trim plate and handle, tightening screws evenly. Turn the water back on and check for leaks while testing handle movement for smooth hot and cold control. Keep going, and you’ll uncover tips for a flawless, long-lasting setup.
Gather Necessary Tools and Materials
Before you begin installing your single-handle shower faucet, gather all the necessary tools and materials to ensure a smooth process. You’ll need an adjustable wrench, a screwdriver set, plumber’s tape, and a pipe wrench. Have a bucket handy to catch any water drips.
Make sure you have the new single-handle faucet kit, which should include the handle, valve, trim plate, and any required screws or washers. It’s helpful to have a level and a flashlight for better visibility in tight spaces. Also, keep some cleaning supplies nearby to wipe off any debris or old sealant.
Turn Off Water Supply and Remove Old Faucet
Once you’ve gathered all your tools and materials, the next step is to shut off the water supply to your shower. Locate the main water valve for your home and turn it clockwise to close it. If there’s a local shut-off valve near the shower, use that instead for convenience.
After shutting off the water, open the shower faucet to drain any remaining water from the pipes.
Next, remove the handle of the old faucet by unscrewing the set screw, usually hidden under a decorative cap. Then, take off the escutcheon plate by unscrewing the mounting screws.
Finally, unscrew the old valve body or cartridge carefully. Make sure the area is dry and clean before moving on to the next step.
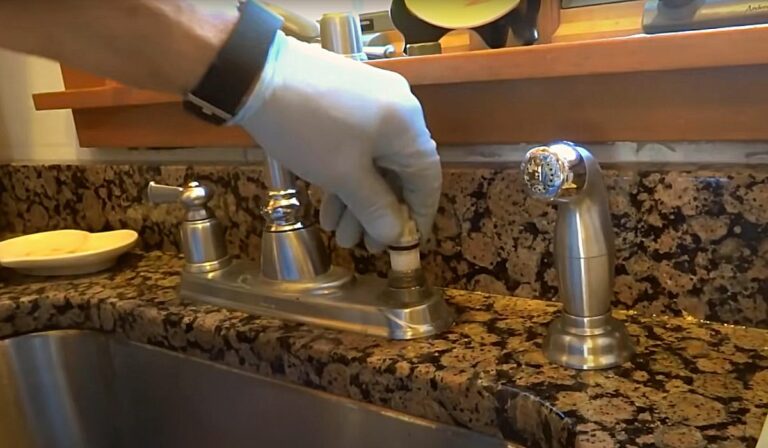
Prepare the Plumbing and Install New Valve
Although the old valve is removed, you’ll need to inspect the plumbing to ensure it’s clean and free of debris before installing the new valve. Use a flashlight to check inside the pipe for any buildup or corrosion.
If needed, flush the pipe with water to clear out particles. Next, dry the area thoroughly to prevent moisture from affecting the new valve’s seal.
Apply plumber’s tape around the valve threads to ensure a watertight connection. Carefully insert the new valve into the plumbing, aligning it properly with the pipe and securing it according to the manufacturer’s instructions.
Double-check that the valve is firmly seated and all connections are tight before moving on to the next step in your installation process.
Attach the Shower Handle and Trim Plate
After securing the new valve and confirming all connections are tight, you can move on to attaching the shower handle and trim plate.
First, slide the trim plate over the valve body, aligning the screw holes with the mounting points on the valve. Make sure the plate sits flush against the wall to prevent water from seeping behind it.
Next, secure the trim plate using the provided screws, tightening them evenly with a screwdriver.
Then, position the handle onto the valve stem, ensuring it fits snugly and aligns with any indexing marks or stops.
Finally, fasten the handle with its set screw, usually located on the side or under a decorative cap, and tighten it firmly.
Your handle and trim plate are now properly installed and ready for final testing.
Test the Faucet for Leaks and Proper Function
Before you finish your project, you’ll want to test the faucet to ensure it works correctly and doesn’t leak. Turn the water supply back on slowly and watch closely for any drips around the handle, connections, and spout.
Activate the handle, moving it through its full range to check both hot and cold water flow. Listen for unusual sounds and observe the water pressure.
If you notice any leaks, tighten connections gently without overdoing it. Also, make sure the handle moves smoothly without sticking or resistance.
Check that the water temperature adjusts properly as you move the handle. Testing now saves you from water damage and frustration later.
Once you confirm everything functions perfectly and is leak-free, you’re ready to move on confidently.
Final Adjustments and Maintenance Tips
Once you’ve confirmed the faucet works smoothly and without leaks, it’s time to focus on final adjustments and maintenance tips to keep it performing well over time. First, fine-tune the handle’s alignment so it sits perfectly centered when off. Tighten any loose screws on the handle or escutcheon plate to prevent wobbling.
Regularly clean the faucet using a mild soap solution to avoid mineral buildup—avoid harsh chemicals that can damage finishes. Check the aerator and remove debris if water flow weakens. Inspect seals and cartridges annually, replacing worn parts promptly to prevent leaks.
Frequently Asked Questions
Can I Install a Single Handle Shower Faucet Myself Without Plumbing Experience?
You can install a single handle shower faucet yourself, but without plumbing experience, it might be tricky. You’ll need patience, proper tools, and careful reading of instructions. Consider watching tutorials or asking for help if unsure.
What Types of Shower Valves Are Compatible With Single Handle Faucets?
You’ll want to choose pressure-balancing or thermostatic shower valves, as both work well with single-handle faucets. Make sure the valve matches your faucet’s brand and style for proper fit and function.
How Do I Choose the Right Single Handle Faucet for My Shower Style?
You’ll want to match your single handle faucet’s finish and design to your bathroom’s style. Consider functionality, water pressure, and valve compatibility. Don’t forget to check reviews and warranties to ensure quality and durability.
Are There Water-Saving Single Handle Shower Faucets Available?
Yes, you can find water-saving single handle shower faucets designed to reduce flow without sacrificing pressure. Look for models with WaterSense certification—they help conserve water, lower bills, and still give you a satisfying shower experience.
What Should I Do if Water Pressure Drops After Installation?
If your water pressure drops after installation, you should check for clogged aerators, clean the showerhead, and ensure the valve is fully open. Also, inspect pipes for blockages or leaks and consider consulting a plumber if issues persist.
Conclusion
Now that you’ve installed your single-handle shower faucet, you’re all set to enjoy a smooth, leak-free shower experience. Remember to double-check for any drips and make final adjustments to ensure everything works perfectly. With the right tools and steps, this upgrade is simpler than you might think. Keep an eye on your faucet for maintenance to extend its lifespan. You did a great job—enjoy your refreshed bathroom!