How To Replace Bathtub Handle Stem
Replacing a bathtub handle stem can seem daunting, but with the right approach and tools, you can tackle this common plumbing repair yourself. Whether the handle is leaking, hard to turn, or simply worn out, learning how to replace the stem will save you time and money by avoiding costly plumber visits. This guide walks you through every step, from preparing your workspace to testing the new stem, so you can restore your bathtub’s faucet smoothly and confidently.
Tools And Materials Needed For Replacement
Before you get started on replacing your bathtub handle stem, assembling the right tools and materials is crucial. Here’s what you’ll typically need:
- Replacement stem: Make sure it matches your bathtub faucet model.
- Screwdrivers: Both flathead and Phillips, depending on your handle screws.
- Adjustable wrench or pliers: For loosening nuts and fittings.
- Allen wrench: Some handles use set screws that require this.
- Plumber’s grease: Helps ensure smooth operation of moving parts.
- Towel or rag: To protect your tub surface and catch drips.
- Bucket: To collect any residual water when you remove parts.
- Utility knife or putty knife: Sometimes needed to remove old caulking or trim.
Having these ready will streamline the replacement process and prevent interruptions mid-project.
Preparing For The Replacement Process
Preparation sets the foundation for a smooth repair. Follow these steps before you touch the handle:
- Turn off the water supply to the bathtub faucet. You can usually do this at the main shutoff valve or at valves under the sink if they control your tub.
- Drain the faucet by turning it on briefly after shutting off the supply. This reduces the chance of water spilling when you remove the stem.
- Cover surrounding areas with a towel or cloth to avoid spills and protect your tub’s finish.
- Identify your faucet type and model to ensure the replacement stem matches exactly. If uncertain, take pictures or notes.
- Locate the handle set screw. Some stems are accessed by removing a decorative cap first: others have exposed screws.
- Gather your tools close at hand so you won’t need to search for them later.
These simple steps reduce hassle and prevent flooding, allowing you to work comfortably and confidently.
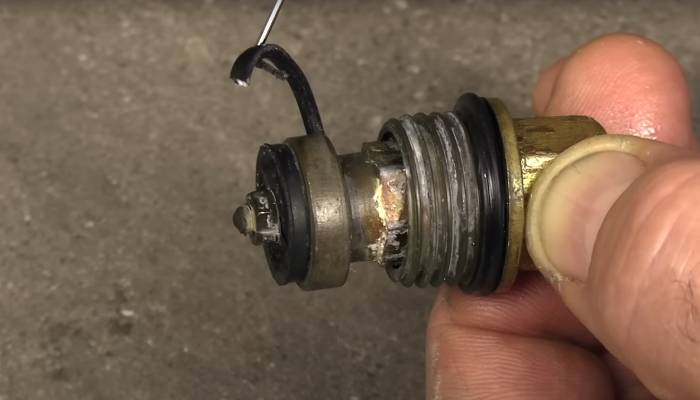
Step-By-Step Guide To Removing The Old Bathtub Handle Stem
Removing the old handle stem can vary slightly depending on your faucet design, but the general process is:
- Remove the handle:
- Pry off the decorative cap (if any) to expose the screw.
- Use the appropriate screwdriver or Allen wrench to unscrew the handle screw.
- Gently pull the handle off the faucet assembly.
- Access the stem assembly:
- If there’s a retaining nut or bonnet, use an adjustable wrench or pliers to loosen and remove it.
- Be cautious not to damage the faucet body.
- Remove the stem:
- Depending on the design, you may need to rotate the stem counterclockwise to unscrew it.
- Pull the stem straight out once loosened.
- Inspect the parts for wear or mineral buildup:
- This helps prevent problems with your new stem installation.
If the stem is stuck, applying penetrating oil and letting it sit for a while may help. Avoid forcing parts, which risks breaking your faucet.
Installing The New Bathtub Handle Stem
With the old stem out, you’re ready to install the replacement. Follow these steps carefully:
- Apply plumber’s grease lightly on the new stem’s O-rings and threads. This reduces friction and prevents leaks.
- Insert the new stem into the faucet body, aligning any tabs or pins correctly.
- Screw the stem in clockwise by hand until snug. Then tighten the retaining nut or bonnet with the wrench, just enough to hold firmly, not to overtighten.
- Replace the handle by sliding it onto the stem and securing the screw.
- Reattach any decorative caps.
Correct installation ensures smooth operation and stops leaks. Double-check that the stem moves freely when the handle turns.
Testing The New Handle Stem And Ensuring Proper Functionality
Once installed, it’s vital to test your work:
- Turn the water supply back on slowly.
- Operate the handle gently through its full range, both hot and cold if applicable, to check for smooth movement.
- Look for leaks around the stem base, handle, and underneath.
- Listen for unusual sounds like dripping or grinding.
- Test water flow and temperature to confirm everything works as expected.
If everything functions smoothly with no leaks, you’ve successfully replaced your bathtub handle stem. If you notice minor leaks or stiffness, revisit tightening steps or lubrication to adjust.
Common Issues And Troubleshooting Tips
You might encounter a few bumps along the way. Here’s how to handle them:
- Handle won’t come off: Check for hidden set screws under caps or sleeves. Sometimes handles are stuck from mineral buildup. Apply gentle penetrating oil and wiggle carefully.
- Stem is stuck in faucet: Don’t force it, apply a penetrating lubricant and wait. Use heat sparingly with caution.
- New stem leaks after installation: Ensure O-rings are intact and greased. Tighten retaining nuts just enough without stripping.
- Handle feels stiff or too loose: Adjust the retaining nut slightly, and reapply plumber’s grease.
- Wrong stem size: Double-check model numbers or bring the old stem to the hardware store for an exact replacement.
Patience and close attention to detail are your best tools for tackling these hurdles effectively.
Conclusion
Replacing a bathtub handle stem might sound intimidating, but with the right tools, careful preparation, and methodical steps, it’s a manageable DIY task. You can save money and gain satisfying hands-on experience by taking on this repair yourself. Remember to gather proper tools, identify your faucet model, work patiently, and test thoroughly. Should tough problems arise, don’t hesitate to seek professional advice. Eventually, this simple repair not only restores your bathtub’s functionality but also adds to your home maintenance skills toolkit for future projects.